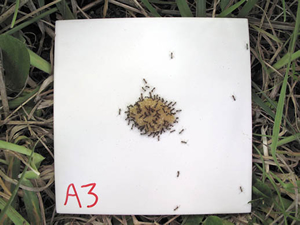
Baited tile. Image – Richard Toft ©Entecol
Baited Tiles
| We recommend this technique for monitoring. |
This method uses a digital camera to record the numbers of ants on and around a bait placed in the middle of a ceramic tile. The tiles should all be the same size, with 10 × 10 cm wall tiles being perfect. The tiles should be of a pale colour to contrast with the ants, and have a matt finish rather than gloss, so they do not create glare points that obscure ants when photographing.
A line (or grid) of 20 or 30 tiles placed 5–10 m apart provides a good assessment of ant abundance in an area. A small amount of suitable non-toxic bait (e.g. a half-teaspoon of tinned salmon ) can be placed in the centre of the tile and the tiles left. Liquid baits are not effective for this method because they run off the tiles. If you are doing multiple sites, you can use a marker pen to write a site/transect identifier letter, and the number of the tile in the transect if using fixed positions, e.g. A1, A2, etc.

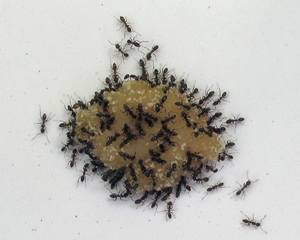
Enlargement of baited tile. Image – Richard Toft
©Entecol
Assessment is undertaken after one hour. A typical compact digital camera (6 megapixel or higher) with a macro function is used to take an image of every tile. Frame the photograph so it is as close as possible to the bait while having the entire tile within the image frame. If few ants are present, tiles can always be photographed again after another hour has passed.
Afterwards, view the images on a computer screen. The label on the tile identifies the site and tile number for each photograph. The camera itself records the date and time of exposure in the exif file data that is automatically saved with the image (just ensure the date and time settings on your camera are correct). After recording this data in a spreadsheet, simply count all the ants that are within the bounds of the tile edges (including those on the bait itself and those just walking over the tile). Using the edges of the tile as a boundary gives the exact same area to count in each photo.
The ceramic tiles have sufficient weight that they remain in place, even in windy conditions, and they are easily washed clean for use in later trials. A cloth damped with methylated spirits can be used to wipe the marker pen lettering off the corner if you wish to re-label them in the future. One drawback with the tiles is if you are using them in an area frequented by pets or birds that may take the bait before counting. In these situations you should consider remaining on site and slowly walking up the line to discourage any animals. You can also shorten the time they are left before photographing to 30 minutes, which is often sufficient in heavily infested areas. However, if using this method to monitor changes, you need to standardise the length of time the baited tiles are left and use that for all subsequent measures.
The advantages of baited tiles are:
- An easily learned technique
- A number of sites can be visited in a single day
- Can assess effectiveness of control programmes using recruitment counts (abundance)
- No identification skills required for initially placing baits out
- Non-toxic bait indicates likely acceptance rate of toxic bait (can use as a prefeed)
- Tiles remain in place in windy conditions
- Data can be saved for later assessment or evidence
The disadvantages of baited tiles are:
- A return visit is needed (to place out, and then return for photographing and pickup)
- Cost of equipment including bait and tiles (but can be washed and reused)
- Cost of time to: (i) set up numbered grids with numbered tiles, and (ii) process images
- False negatives, where ants are present but not attracted to the bait (e.g. seasonal preference for food, abundant resources already available)
- Vandalism can occur, particularly in urban areas, with people (generally trying to tidy up!)
- Wide spacing may miss smaller ant colonies
- Some non-target activity on tiles
|
|
|
|

 Direct searching
 Baited vials
 Baited tiles
 Pitfall traps